Povitica Bread Recipe
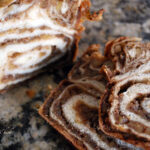
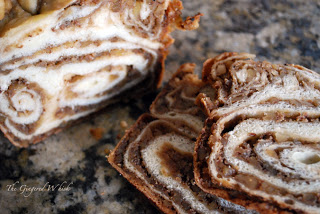
Povitica bread is a traditional Eastern European dessert bread that is as lovely to look at as it is to eat! A sweet swirled bread filled with nuts and cinnamon sugar, this Povitica bread recipe makes a delicious holiday treat.
I am so excited to be this month’s Daring Bakers’s host, and I hope that you really like the recipe I have chosen!
I was first introduced to Povitica from a friend of mine (Hi Brianne!!). We happened to be at the Farmer’s Market and when we passed a particular booth selling specialty bread, and she just went ecstatic. She and her family have been buying these loaves of the swirled bread every holiday season, and she was very excited to see them in the middle of the summer. I didn’t know what the excitement was about, but the loaves of bread were beautiful, and when sliced, had delicate circular designs on each slice.
After tasting the wonderful bread we bought at the Farmer’s Market, I knew I needed to learn how to make this myself. Especially since that one single loaf cost an arm and a leg ($25! For one loaf!) I spent days and days trying to find recipes online, but I didn’t have any luck. (However, I did a search the other day and it seems that a few recipes have sprung up in the meantime.)
After much research, I created my own povitica recipe, one that I think is a very close match to the delicious loaf of bread I splurged on at the Farmer’s Market. And I am so excited to share this Povitica recipe with you!
The Daring Bakers community did a fantastic, awesome, wonderful job making povitica! They came up with some fantastic fillings, and all their loaves look truly great!
Another of my favorite traditional holiday recipes is Traditional Yeasted Stollen and Apple Cider Wassail!
What is Povitica?
Povitica recipe is a dessert bread filled with a sweet filling and rolled to create intricate patterns. It weighs an amazing 2.5 pounds when done!! They are usually for sale during the holidays, but they can cost around $25 for one loaf.
Other names for Povitica include:
- Nutroll
- Potica
- Kalachi
- Strudia
- Gubana
- Makiwiec, and
- Orahnjaca
Family recipes and the secrets on how to roll the bread so thin are passed down through generations of families. However, the tradition of baking this type of bread has become somewhat of a dying art form, so I thought it would be a wonderful opportunity for to learn to make this wonderful sweet bread.
Filling for Povitica
The traditional filling for this bread is an English walnut filling, but other typical fillings also include poppy seed, apple-cinnamon, apricot preserves, and a sweet cheese (like cream cheese).
Here is a recipe for a traditional poppy seed filling, as donated by Daring Baker Bojana of Kitchen Love. This is her family’s recipe.
- 600 g ground poppy seeds
- 250 g sugar
- 200 ml hot milk
- 150 g raisins (optional)
- 1 vanilla pod, scraped.
- Grind poppy seeds in a spice grinder until they are fine, they will change colors from gray to indigo or black in color.
Mix dry ingredients and then add boiling hot milk to it. If it seems too thin, cook for a few minutes.
How long does it take to make Povitica?
The hands on time for the recipe isn’t very long, but you will have some rising time, and it takes a while to roll out the dough so that it is really thin and then roll into the loaf shape.
- Making the dough: 40 minutes
- Rising: 1 hour and 30 minutes
- Rolling and assembly: 20 minutes per loaf, a generous total of 1 hour
- Baking: 1 hour
- Cooling: 30 minutes
- Making the filling: 15 minutes, including grinding of the nuts
How to Roll Povitica
This is a promotional video from a company that makes it, Strawberry Hill, but it shows them rolling the povitica. Watch this a few times before baking so you get an idea of how thin they roll the dough out, and how they create the patterning in the dough.
Povitica from Strawberry Hill
http://www.youtube.com/watch?v=_W6pmqzVJ4c
How to Make the Povitica Recipe
Make Walnut Filling:
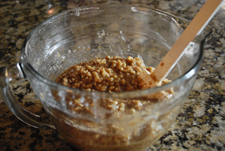
- In a large bowl mix together ground walnuts, sugar, cinnamon, and cocoa.
- Heat milk and butter to boiling. Pour the liquid over the nut/sugar mixture. Add eggs and vanilla and mix thoroughly.
- Allow the filling to stand at room temperature until ready to be spread onto the dough.
- If the mixture thickens, stir in a small amount of warm milk.
Activate Yeast:
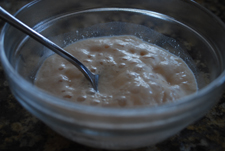
- In a small bowl, stir 2 teaspoons sugar, 1 teaspoon flour, and the yeast into warm water and cover with plastic wrap.
- Allow yeast to stand for 5 minutes

Make the Dough:
- In a medium saucepan, heat the milk up to just below boiling (about 180 F or 82 C), stirring constantly so that a film does not form on the top of the milk. You want it hot enough to scald you, but
not boiling. Cool slightly, until it is about 110 degrees. - In a large bowl, mix the scalded milk, ¾ cup sugar, and the salt until combined.
- Add the beaten eggs, yeast mixture, melted butter, and 2 cups of flour.
- Blend thoroughly and slowly add remaining flour, mixing well until the dough just starts to clean the bowl. Don’t add too much flour at this point, you still want it to be fairly wet and sticky.
- Turn dough out onto a floured surface and knead, gradually adding flour a little at a time, until smooth and does not stick. Note: I did not have to use all 8 cups of flour.
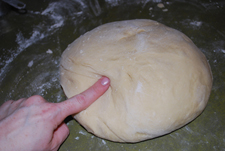
- Divide the dough into 4 equal pieces (they will each weigh about 1.25 pounds)
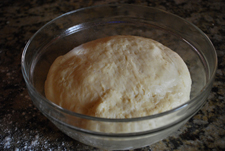
- Place dough in 4 lightly oiled bowls, cover loosely with a layer of plastic wrap and then a kitchen towel and let rise in a warm place for an hour and a half, or until doubled in size.
Roll and Assemble the Dough:
- Spread a clean sheet or cloth over your entire table so that it is covered. Sprinkle sheet with a couple of tablespoons to a handful of flour (use flour sparingly)
- Place the dough on the sheet and roll the dough out with a rolling pin, starting in the middle and working your way out, until it measures roughly 10-12 inches in diameter. Spoon 1 to 1.5 teaspoons of melted butter on top.
- Using the tops of your hands, stretch dough out from the center until the dough is thin and uniformly opaque. If you prefer, you can use a rolling pin.
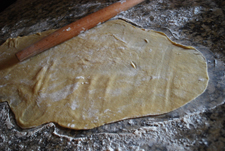
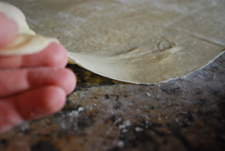
As you work, continually pick up the dough from the table, not only to help in stretching it out, but also to make sure that it isn’t sticking. When you think it the dough is thin enough,
try to get it a little thinner. It should be so thin that you can see the color and perhaps the pattern on the sheet underneath.
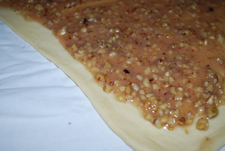
- Spoon the filling evenly over the dough until covered, leaving space around the edges.
- Lift the edge of the cloth and gently roll the dough up like a jelly roll.
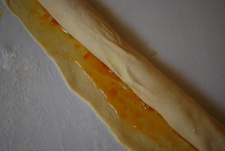
Once the dough is rolled up into a log shape, gently lift it up and place it in the shape of a “U” into a greased loaf pan, with the ends meeting in the middle. You want to coil the dough around itself, as this will give the dough its characteristic look when sliced.
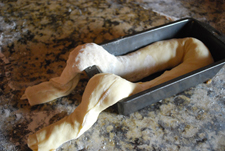
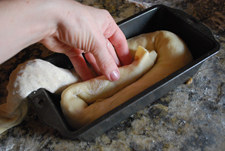
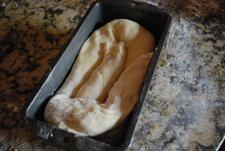
Repeat with remaining three loaves.
- Brush the top of each loaf with a mixture of 1/2 cup of cold STRONG coffee and 2 tablespoons of sugar. If you prefer, you can use egg whites in place of the coffee.
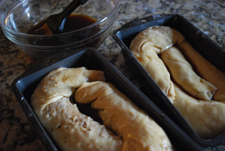
- Cover pans lightly will plastic wrap and allow to rest for approximately 15 minutes. Meanwhile, preheat oven to 350 degrees F.
- Remove plastic wrap from dough and place into the preheated oven and bake for approximately 15 minutes. Turn down the oven temperature to 300 degrees and bake for an additional 45 minutes, or until done. Check the bread every 30 minutes to ensure that the bread is not getting too brown. You may cover the loaves with a sheet of aluminum foil if you need to.
- Remove bread from the oven, bursh with melted butter, then allow to cool on a wire rack for 20-30 minutes.
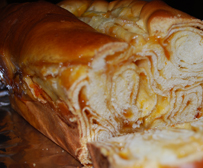
- The best way to cut Povitica loaves into slices is by turning the loaf upside down and slicing with a serrated knife.
Povitica Recipe Notes:
- The povitica recipe calls for using a sheet on top of your workspace. Yes, a bedsheet! This is not necessary, but it is a lot easier to roll out the dough with one. The dough is very sticky, so using the lightly floured sheet helps to keep the dough from sticking too badly. It also helps that you can move the sheet around as you work, and you can also move to a clean area of the sheet for each loaf that you roll out. Using a sheet also helps to roll out the dough thinly.
- A sheet is also used for rolling the povitica up, but again, it is not necessary. For those wondering, all my dough and filling goo washed out perfectly, so no problems there! If you decide not to use a sheet, a pastry scraper will come in very handy when you roll up the dough.
- There are two ways to roll the dough up.
If you watch the video shown below, you will see that the sheet is lifted and used as momentum for rolling the dough up. This technique takes a bit of finesse, but I encourage you to try it out. However, the dough can also be rolled up by hand, similar to making cinnamon rolls. - During the second rising time, after the dough has been filled or rolled, you have a decision to make. If you want a more dense loaf, allow the bread to rise for 15 minutes before baking (as the recipe states). If you want your bread to be less dense and lighter, allow it to rise for a full hour before baking it.
How to Store Povitica
There are two options for storing povitica:
Povitica will keep fresh for 1 week at room temperature and for 2 weeks if refrigerated.
Baked povitica can be frozen for up to three months when wrapped a layer of wax paper followed by a layer of aluminum foil. It is recommended not to freeze povitica with cream cheese fillings, as it doesn’t hold up to being thawed really well – it crumbles.
There’s nothing I love more than seeing you make my recipes! If you make these Slow Cooker Mexican Stuffed Sweet Potatoes, don’t forget to leave a comment below and rate the recipe!
And if you are on Instagram, tag @thegingeredwhisk and use the hashtag #gingeredwhisk on social media when you make my recipes so that I can share them and maybe even feature you. Follow along to get the latest updates:
And don’t forget to subscribe to the email list to get all the extra tips, tricks and bonuses!
Want to save this for later? PIN THIS TO YOUR DINNER BOARD on Pinterest!
Povitica Recipe (Sweet Dessert Bread)
Ingredients
To activate the Yeast:
- 2 teaspoons Sugar
- 1 teaspoon All-Purpose Flour
- ½ cup warm water
- 2 Tablespoons Dry Yeast
Dough:
- 2 cups Whole Milk
- ¾ cup Sugar
- 3 teaspoons Table Salt
- 4 Large Eggs
- ½ cup Unsalted Butter melted
- 8 cups sifted All-Purpose Flour divided
Topping:
- ½ cup Cold STRONG Coffee
- 2 Tablespoons Granulated Sugar
- Melted Butter
Walnut Filling
- 7 cups Ground English Walnuts
- 1 cup Whole Milk
- 1 cup Unsalted Butter
- 2 Whole Eggs Beaten
- 1 Teaspoon Vanilla Extract
- 2 cups Granulated Sugar
- 1 Teaspoon Unsweetened Cocoa Powder
- 1 Teaspoon Cinnamon
Instructions
Make Walnut Filling:
- In a large bowl mix together ground walnuts, sugar, cinnamon, and cocoa.
- Heat milk and butter to boiling. Pour the liquid over the nut/sugar mixture. Add eggs and vanilla and mix thoroughly.
- Allow the filling to stand at room temperature until ready to be spread onto the dough.
- If the mixture thickens, stir in a small amount of warm milk.
Activate Yeast:
- In a small bowl, stir 2 teaspoons sugar, 1 teaspoon flour, and the yeast into warm water and cover with plastic wrap.
- Allow yeast to stand for 5 minutes.
Make the Dough:
- In a medium saucepan, heat the milk up to just below boiling (about 180 F or 82 C), stirring constantly so that a film does not form on the top of the milk. You want it hot enough to scald you, but not boiling. Cool slightly, until it is about 110 degrees F.
- In a large bowl, mix the scalded milk, ¾ cup sugar, and the salt until combined.
- Add the beaten eggs, yeast mixture, melted butter, and 2 cups of flour.
- Blend thoroughly and slowly add remaining flour, mixing well until the dough just starts to clean the bowl. Don't add too much flour at this point, you still want it to be fairly wet and sticky.
- Turn dough out onto a floured surface and knead, gradually adding flour a little at a time, until smooth and does not stick. Note: I did not have to use all 8 cups of flour.
- Divide the dough into 4 equal pieces (they will each weigh about 1.25 pounds)
- Place dough in 4 lightly oiled bowls, cover loosely with a layer of plastic wrap and then a kitchen towel and let rise in a warm place for an hour and a half, or until doubled in size.
To Roll and Assemble the Dough:
- Spread a clean sheet or cloth over your entire table so that it is covered. Sprinkle sheet with a couple of tablespoons to a handful of flour (use flour sparingly)
- Place the dough on the sheet and roll the dough out with a rolling pin, starting in the middle and working your way out, until it measures roughly 10-12 inches in diameter. Spoon 1 to 1.5 teaspoons of melted butter on top.
- Using the tops of your hands, stretch the dough out from the center until the dough is thin and uniformly opaque. If you prefer, you can use a rolling pin. As you work, continually pick up the dough from the table, not only to help in stretching it out but also to make sure that it isn’t sticking. When you think it the dough is thin enough, try to get it a little thinner. It should be so thin that you can see the color and perhaps the pattern on the sheet underneath.
- Spoon filling evenly over the dough until covered.
- Lift the edge of the cloth and gently roll the dough up like a jelly roll. Once the dough is rolled up into a log shape, gently lift it up and place it in the shape of a “U” into a greased loaf pan, with the ends meeting in the middle. You want to coil the dough around itself, as this will give the dough its characteristic look when sliced. Repeat with remaining three loaves.
- Brush the top of each loaf with a mixture of 1/2 cup of cold STRONG coffee and 2 tablespoons of sugar. If you prefer, you can use egg whites in place of the coffee.
- Cover pans lightly will plastic wrap and allow to rest for approximately 15 minutes.
- Meanwhile, preheat oven to 350 degrees F. Remove plastic wrap from dough and place into the preheated oven and bake for approximately 15 minutes. Turn down the oven temperature to 300 degrees F. and bake for an additional 45 minutes, or until done. Check the Povitica every 30 minutes to ensure that the bread is not getting too brown. You may cover the loaves with a sheet of aluminum foil if you need to.
- Remove bread from the oven, brush with melted butter, then allow to cool on a wire rack for 20-30 minutes.
- The best way to cut Povitica loaves into slices is by turning the loaf upside down and slice with a serrated knife.
Nutrition

Thank you so much for introducing me to povitica!! This was a wonderful (and DELICIOUS!) challenge and you were a fantastic, energetic, encouraging, sweet hostess!! This is definitely a keeper recipe that I plan to make over and over.
Thankyou so much for choosing this challenge. The momen i saw what was the challenge i was so excited and I made it in two days. you woudn't believe the excitment was in my home while i was making this bread and I was so excited aobut the end result that I skyped my sis and showed it to her and then you can imagine teh ohhhhhhhh and woooooooooow from the other side 🙂
Thank you so so much for an amazing challenge
I will be making this again and again.
You were a woderful supportive hostess this month, thank you again
Can't thank you enough, Jenny! Povitica was an absolute hit! And you were an excellent hostess. I think everyone's in love with this loaf 🙂
Congratulations on the choice and on all the hard work putting this challenge together for us. I loved every bit of it!
Thanks for a great challenge, Jenni! I had never heard of Povitica before, so you opened my eyes to a new treat. I'll definitely be making it again (and again). Thanks for all your encouragement and inspiration this month!
What a gorgeous loaf of bread! It's always a great idea to keep traditional recipes from dying out.
Great challenge! I loved and had so much fun with it. Thanks
Best, Sandie
Thank you so much Jenni for hosting. I loved the povitica and I will be using the recipe over and over again.
Such a wonderful recipe this month.. I only had the chance to make one loaf, but I am so inspired to try again using some of the ideas I got from the forum. Thank you!
Thank you so much for this fantastic challenge which brought me back to my childhood, but introduced a very welcome "innovation" to this. Your step-by-step instructions with pictures were very much appreciated!
I make Potica every Christmas. I learned from my grandma. But now you're making me want it now! I might have to make it early this year 😀
I really like the way you've coiled it on top of itself in a loaf pan. We always just coil it around itself on a cookie sheet but it looks even cooler the way you've done it. I may have to try that this year 🙂
Thank you, thank you, thank you! For such a fantastic and delicious challenge – I'm eating a piece of my Povitica now, and browsing all the fantastic ones people have made. Brilliant :o) Your instructions were great and enabled some amazing creations!
Not an original comment, but another massive vote of thanks from me Jenni. You were a great host and this recipe is amazing – I'm utterly in awe of you for creating it!
Thank you so much I loved this challenge Your povitica is beautiful and I love all the pictures they helped me a lot since my English sometimes does not help me ha ha ha
Thank you for amazing challenge! 🙂 Whole family loved it 🙂
Having never heard of this bread or seen it before, I can't thank you enough! I joined the Daring Bakers club to challenge me to learn how to bake with hopes of someday having the ability to get creative with baking and bread making. I now have a flurry of ideas for fillings for this crazy amazing bread! and it's only my 4th challenge, so I really owe you and the Daring Baker forum posters a big thank you!!!
What a wonderful Povitika you have here! I just love this recipe – thank you so much for hosting and for introducing us to this lovely bread.
wow..sounds absolutely yummm n delicious…excellent try..
first time here …love your space..
awesome posts with nice presentation..
Am your happy follower now..;)
do stop by mine sometime..
Tasty Appetite
$25 for a loaf? Wow, I definitely get why you learned how to make it. Was a great challenge, thanks!
thanks for the recipe and the great step by step pics! they were very useful to me! you were a great host!
Your challenge came out beautifully! Congrats 🙂
Thanks for such a wonderful challenge!!
Jenni thank you so much for a wonderful challenge-and a recipe that I'll forever keep because it is just a winner all round! 🙂
Thank you for such an awesome challenge,my friend. I never would have made povitica if not for you due to it being a bit laborious and tough, but wow, the crumb, the filling, the flavor…love it, and loved your recipe even though I botched it up lol Great hosting job, and beautiful povitica!
Thanks for the great challenge and step by step photos! Nice job!
Thank you so much for choosing this as our challange. I'd never heard of Povitica before but I love it! Will make it again. Thanks 🙂
Thank you so much Jenni. Great challenge and I really LOVED it. I couldnt stop clicking pictures of my finished povitica, it looked really great – thanks to your detailed stepwise pictures and instructions 🙂
Thank you so much Jenni for this wonderful challenge. I absolutely loved Povitica and I will try it again and again and again until I reach perfection. Big hug from Madrid-Spain 🙂
Another big thankyou from me Jenni – this was one of my favorite challenges so far, it looks and tastes amazing. WIN!!
Thanks Jenni for a fantastic challenge! I love the bread and will be making it again, using your recipe, which was perfect. I can't wait to try different fillings, and maybe I will make 4 loaves next time, as they don't last long!
Kudos on a fabulous challenge! This is one of those recipes I see myself making again and again, and I wouldn't have tried it without you! My family says thanks too…lol…
Thank you Jenni this wonderful challenge!I love it so much!
kisses!
Jenni, I have to thank you for such a wonderful challenge this month!!! It was so much fun to try a very new technique…and have it turn out so beautiful and delicious!! So nice to meet you, too~
Jenni, you know I LOVE this recipe! Thank you so much for choosing it! Thank you also for putting in so much effort in ensuring a no fail recipe! And thank you for your comments on my blog! You have been a very gracious host!
Such a fabulous challenge! I ran out of time to make it, but printed it off and hope to get it made for the holidays.
You are amazing, I owe you big time for this recipe! It is really impressive that you put it together yourself! Thank you, thank you!
I just loved this challenge, Jenni. Thank you so much! I'm going to have to hide the recipe or I won't stop making (and eating) it. Definitely trying the walnut filling next. Thanks again. 🙂
Thank you for such an amazing recipe 🙂 It's going to wow a lot of people and it really isn't too difficult.
What a fabulous challenge you picked for the month Jenni. It's the best sweet dough bread I have ever made, and the prettiest too. I was late making it. Just got the challenge done yesterday and the bread is already down to it's last slice. The recipe is a keeper, and the art AMAZING! Thank you!
Thank you for hosting this month's challenge. It was delicious and your looks great!
What a fun challenge! And delicious, too. Thanks for hosting it. And nice work on your own loaves!
Thank you for the lovely compliment on my Potivitica! I feel honoured that the host herself commented on my post. Your blog is beautiful!
Jenni, thanks for a wonderful challenge and for introducing me to a wonderful bread that I will definitely be making again. Thanks for checking out my post also. I have to say that I have a new routine of warming a large hunk of the bread in the microwave for 30 seconds and serving with well chilled cream on return home every day! Heaven, you should try it! THANK YOU! Poppy
Thanks for this great challenge! I'm going to be making some more before Thanksgiving…my dad wants to try the cheese one! I am a 3rd year resident in pediatrics. The three years will go by so much faster than you think it will.
Congratulations on your wonderful job in hosting the DB's challege.
It was a success at home. Thank you!
Thank you so much Jenni for introducing me to something so new and so delicious! I'm definitely going to make it again with walnuts this time, and I'm going to roll the dough much thinner (I was rushing so my swirls were a bit wide). In the meantime, I'm slowly working my way through the two loaves my fussy family wouldn't eat (their loss.) So glad you gave us refrigerating/ freezing instructions on how to keep our bread.
Thanks again!
I found a pic of this on pintrest and followed it to your blog. I live in Butte, MT where many Europian people settled. Povitica is well know in this town. My grandmother taught me to make it. With the older generation dying fewer and fewer people know how to make it. I make mine in bundt pans and usually make about 150 of them at Christmas time. Mine does not have chocolate in it so I will have to try it. You did a great job explaining how to make it.
They would be lovely in a bundt pan! But more dangerous as there would be more for me to eat! 🙂 150 at a time is quite an undertaking! I am sure all your friends and family love it!
I loved loved loved the October challenge. I thought that you gave one of the most thoughtful and thorough challenges ever. Thanks so much. You are a gem!
How big are the loaf pans used to make this bread? Thanks.
Hi Lena! Use a regular loaf pan (like what you would use for a loaf of quick bread). You could also make mini ones, which would be really cute! 🙂
I’ve been looking for a new dessert and I am so happy to have found this recipe. This is a big hit to my family! I’ll definitely make this again.
This was just the baking project I needed to kick off the holiday season! This bread is gorgeous and absolutely delicious! Thank you for sharing the recipe!
Amazing, followed up as indicated and come out delicious! Thank you