How to make a sourdough starter
If you want to learn how to make a sourdough starter, this is the only step by step guide you need! Making a sourdough starter is easy – just mix together flour and water and be patient! This guide will show you the exact steps you need to know and answer all your questions!
Want to join the sourdough club? I mean, who wouldn’t! With all the amazing and delicious ways you can use it, owning your own sourdough starter is a fun hobby to have! But before you can start baking, you need a sourdough starter!
The process for making sourdough starter is a fairly easy process, but it can seem overwhelming. This guide will break it down for you.
What is a sourdough starter?
A sourdough starter is a live culture of yeast in water and flour. Yes, its alive! You now have a new pet! The flour and water ferment, and the natural wild yeast and bacteria in the environment flourish. This is also known as a “wild yeast” and you can use it to help give bread and baked goods rise, flavor, and texture.
Wild yeast is found everywhere. In the sourdough starter, the wild yeast digests the flour and water and produces carbon dioxide. The carbon dioxide produces air bubbles (which helps to give the bread texture) and alcohol (which gives sourdough its flavor).
Every starter is unique. Each one has its own individual look, smell, personality, and behavior, depending on the water and flour you feed it and the environment in your house.
Sourdough Terminology
Sourdough can seem complicated because there is a whole new world of words to go around with it! Here is a breakdown of important words you need to know.
Feeding a sourdough starter
You will often hear people refer to “feeding their starter” as if it was a live pet. And, it kind of is! Remember how I said that a starter was filled with wild yeast? Well, yeast is alive, and you need to feed it! This is simply giving the yeast in your starter more flour and water.
Sourdough hydration
Hydration refers to the ratio of flour to water. You can have the hydration rate refer to the starter itself, and also to the bread recipe. The most common ratio for sourdough starters, and the one we are going to use here, is a 100% hydration. That means there is equal amounts of flour and water. There are other rates, too, and you can use them to achieve different results in your bread. A low hydration means there is more flour than water. A high hydration means there is more water than flour.
Sourdough discard
Discard is It is kind of an unfortunate name because often people assume that because you are “discarding” and not feeding it, that it is not worth anything. In fact, it is just a hungry and inactive starter. Feed it, and it becomes active again! You only create discard when you feed your starter so that your starter supply doesn’t continue getting larger and larger and take over the world some day. Read “feeding your sourdough starter” to find out even more information on discard and what to do with it!
Hooch
At any point in your starter’s life, a brown liquid can form on top. This is called hooch, and it can be lightly colored or darkly colored. This is a naturally occurring alcohol that is caused by your yeast eating through all of the available food in the jar. Seeing hooch is an indication that your starter is hungry and needs to be fed. The darker the liquid, the hungrier it is. You can choose to pour this off, or stir it back in when you feed your starter.
What equipment do I need to make a sourdough starter?
Jenni Ward/The Gingered Whisk is a participant in the Amazon Services LLC Associates Program, an affiliate advertising program designed to provide a means for sites to earn advertising fees by advertising and linking to Amazon.com.
You don’t need many things for creating your own sourdough starter, just a few simple tools:
- Food scale
- 1 bag whole wheat flour
- Filtered or Tap water (if its chlorine and chloramine free!). Bottled water also works, but do not use distilled water.
- Glass Jar (I like mason jars like this)
- Wooden spoon or silicone spatula to stir with.
- A scrap of clean fabric – like t-shirt material or fabric scrap that is wider than the mouth of the jar.
Why whole wheat flour? We are going to start with whole wheat flour, because whole grain flour tends to have a more rich environment for the wild yeast than all purpose. It’s just to help jump start the starter process. After that you can choose to continue feeding with the whole wheat flour or switch to unbleached all purpose flour. If you don’t have whole wheat flour, you can use unbleached all purpose, too, it just might take a little longer to get going.
*Note: You can use the same process to create a starter with rye or spelt flour. Because whole grain flours absorb more water than all purpose water, you will need to adjust the amount of water you use to create a consistency that is like a muffin batter.
How to make a sourdough starter
Equipment
- Food Scale
- Glass Jar (I like mason jars like this)
- Wooden spoon or silicone spatula to stir with.
- A scrap of clean fabric – like t-shirt material or fabric scrap that is wider than the mouth of the jar.
Materials
- 1 bag whole wheat flour
- 1 bag unbleached all purpose flour
- Filtered or Tap water if its chlorine and chloramine free!. Bottled water also works, but do not use distilled water.
Instructions
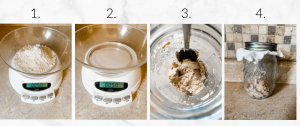
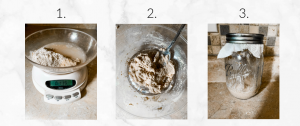
- Day One: Start with a clean glass jar. I like to use a mason jar because its easy and cheap. Add 50 grams of water and 50 grams of whole wheat flour to your jar and stir well to combine. It should be like a thick paste. Cover it with a breathable top (like a clean old t-shirt or fabric scrap) and use the ring that came with the mason jar to screw it on. Place the jar in a place that is warm (70 – 75 degrees F) and leave it for 24 hours.

- Day Two: After 24 hours, add an additional 50 grams of whole wheat flour and 50 grams of water. Stir it well, scrape down the sides of the jar, re-cover, and set aside.
- Day Three: Add an additional 50 grams of whole wheat flour and 50 grams of water. Stir well, scrape down the sides, re-cover and set aside. You might see a few bubbles start to form in an hour or so, and that’s good! If not, that’s ok, too.
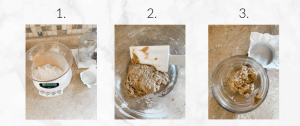
- Day Four: Remove 25 grams of your starter mixer from the jar. The remaining starter needs to end up in the trash (do not put it down the sink, it will dry into a cement-like glob that will clog your drains). To that 25 grams, add 50 grams of flour and 50 grams of water. Stir well, scrape the sides of the jar down, re-cover and set aside.
- Day Five: Add an additional 50 grams of flour and 50 grams of water. Stir well, scrape down the sides, re-cover and set aside.
- Day Six: Add an additional 50 grams of flour and water. Stir well, scrape down the sides, re-cover and set aside.
- Day Seven through Fourteen: Continue removing half of your discard and feeding it with 50 grams of flour and water. Stir well. At this point, your starter should start to have some good activity to it – you should be seeing bubbles, and it could even be doubling at this point. You now need to move to feeding it twice a day (every 12 hours)
- Day Fourteen and beyond: Congratulations! You now have a sourdough starter that is ready to use! Give it a fun name, and start baking!

Read my guide on how to maintain and feed your sourdough starter on a regular basis.
Questions you might have about making a sourdough starter:
Got questions? I’ve got answers! Here are the most commonly asked questions asked when making a sourdough starter. Don’t see your question below? Leave a comment and I’ll get it answered!
It doubled! Is it ready to use?
Not yet! Starters often have a “false start” at around 5-7 days. If your starter seems to be really active soon, is making bubbles and maybe even growing a little bit, that is awesome! But your starter isn’t ready to use just yet. Often the activity level ramps up, and then slows down for a few days, and then slowly builds back up.
How long does it take to make a sourdough starter?
Two weeks. Yes. I know, there are recipes out there that tell you that your starter is ready after 5 days, or as soon as it doubles in size, but it really does take a good 2 weeks for the yeast in your starter to be strong and healthy.
Do I really have to throw away the “discard”?
When your starter is mature (past two weeks old), then heck no! Check out my post on easy sourdough discard recipes for all the recipe ideas to use. But for now, yes. Right now your starter is in the beginning stages of growth, and you are trying to cultivate the good yeast and bacteria. It doesn’t have the right smell, the right taste, and is full of bacteria that you don’t typically want in your starter. I recommend throwing it away in the trash until your starter is doubling in size consistently. And then use your discard in all the recipes!
How will I know when my starter is ready to use?
When your starter is 10-14 days old and is very bubbly and doubles or triples in size after a feeding. It should smell like yeast bread, and look a little frothy and bubbly on top.
Do I have to keep feeding it every day?
Once your starter is mature enough (2 weeks or more), you can store it in the fridge when you are not actively using it. Feed it, place the lid on it (But not tight, it still needs to breathe), and store it in the fridge for a week. Take it out once a week and feed as normal.
How do you store a sourdough starter?
Once your starter is established (past two weeks), you have two options for storing your starter.
- On the counter – If you will be baking with your starter often (several times a week), you can leave it loosely covered at room temperature on the counter. You will need to feed it once or twice a day, depending on how quickly it rises and falls.
- In the fridge – If you will bake less often (like once a week or less), store your starter in the fridge. You will only need to feed once a week or so to maintain its strength. When you are ready to use the starter, bring it out of the fridge, feed it, and allow it to double at room temperature.
How to use your sourdough starter
Once you have a starter, you will be amazed at how much you can do with it! Make sure you check out my recipe archive for over 60 easy sourdough recipes! Here are some of my favorites:
AND Sourdough can be used for so much more than just bread! It is also great in desserts! Check out these easy sourdough dessert recipes!
NEXT: Sourdough for Beginners! Using a sourdough starter is a fun and delicious hobby, but it shouldn’t feel like rocket science. Sourdough can be easy, and this guide will help you understand all the different aspects.
Question: I am using equal amounts of wheat flour and water. After 24 hours part of the starter is dry. How much more water do I need to prevent this?
I wonder if this is happening because I live in a dry climate?!
Are you using equal amounts by weight or by volume? And what kind of wheat flour? Sometimes the more organic, stone ground, super hearty flours will absorb more water. The starter should have the consistency of a thick muffin batter. How are you covering your starter jar? Too much air might be getting into your jar as well, you might want to move to something else. I like using either a cheesecloth or a paper towel.