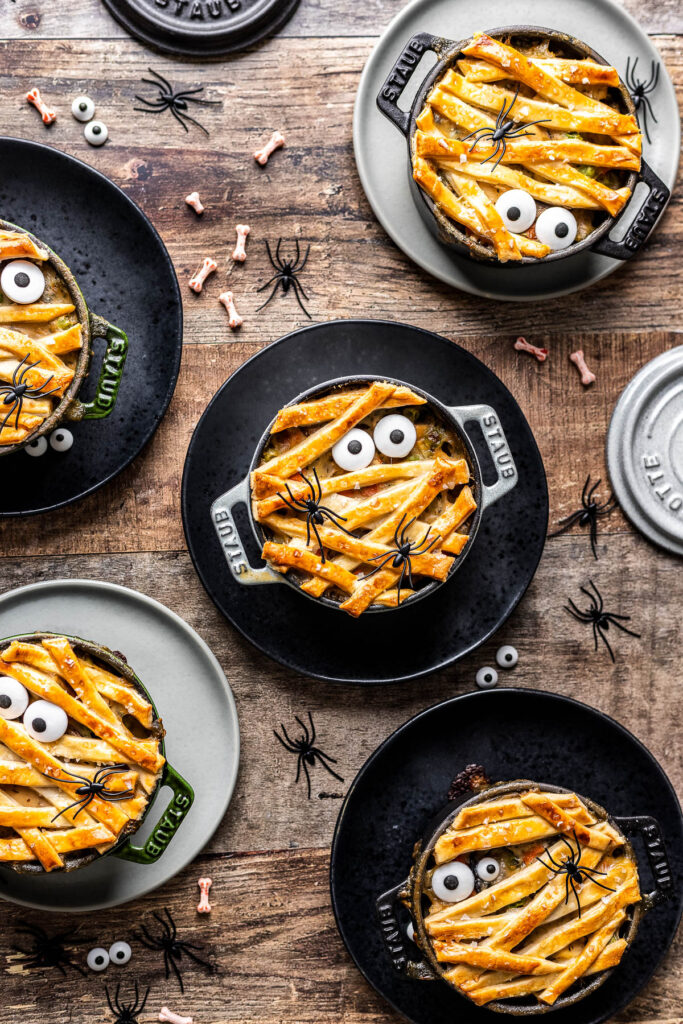
Mummy Mini Chicken Pot Pies

These mini chicken pot pies are the cutest addition to your halloween feast. Ready in under an hour, these are the perfect meal to serve to your family on Halloween.

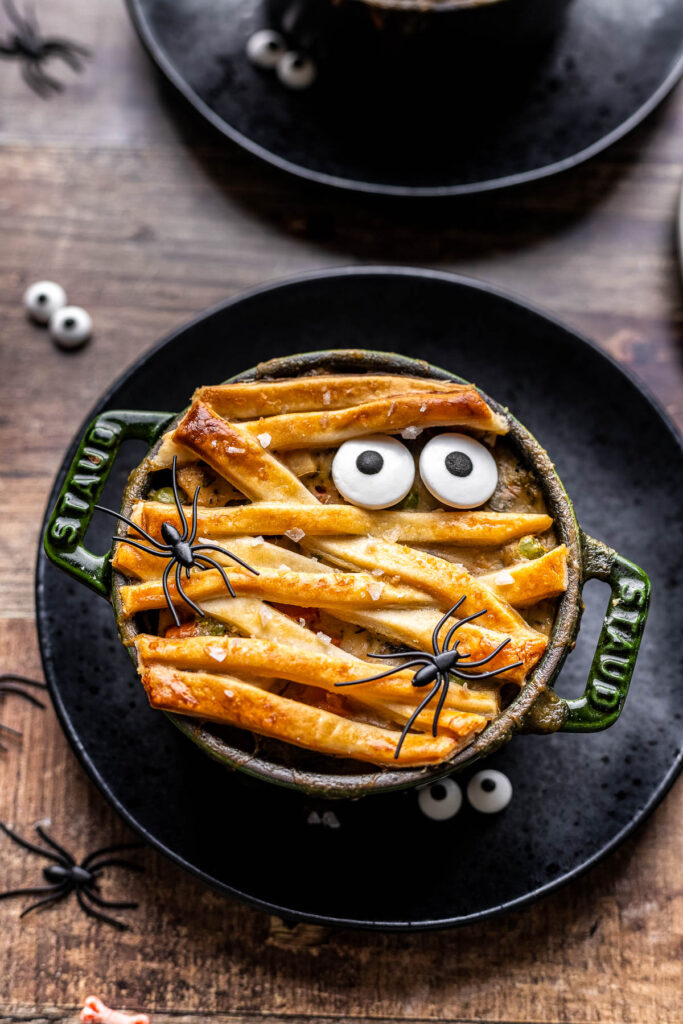
These mini chicken pot pies are a super fun and easy meal to serve before Trick-or-Treating, especially when its a cold night out! Made with already cooked chicken (I recommend using leftover chicken or grabbing some rotisserie at the store), veggies, and pre-made pie dough, these are a relatively quick and easy meal that your kids will love.
Other kid friendly Halloween recipes:
What I love about this recipe is that it is quick, a great use of leftover chicken, and you can make it year round easily. Not halloween time? Just skip adding on the eyeballs after baking!
Want to skip the store bought pie crust? No problem! Try your hand at making homemade sourdough pie crust!

How to make these mini chicken pot pies
This is a simple recipe to make! For the full recipe, make sure you scroll down to the recipe card below.
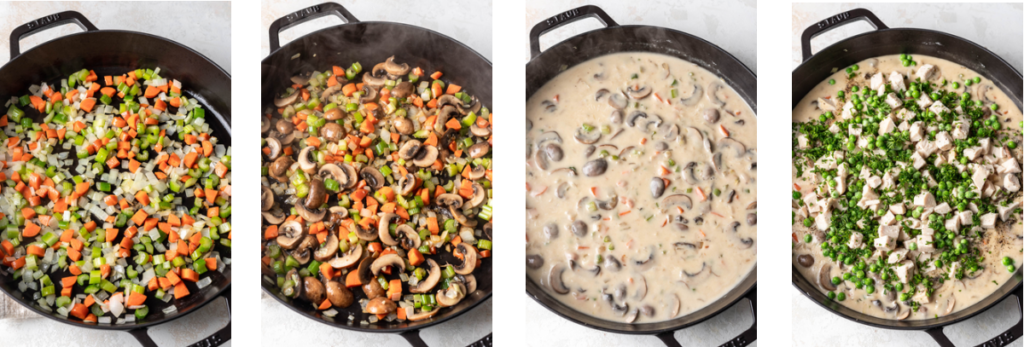
Make the pot pie filling.
- Preheat the oven and spray 4-inch ramekins or oven-safe small pots with nonstick spray.
- Place a large skillet on the stove over medium heat. Melt the butter.
- Once butter has melted, add the onion, carrots, and celery. Cook for 5 minutes, or until the onion starts to turn translucent.
- Add in cremini mushrooms and garlic, stirring occasionally so the garlic does not burn. Cook 3 more minutes, until mushrooms are tender and any liquid they give off evaporates.
- Stir in flour until all the vegetables are coated. Carefully pour in the chicken broth and heavy cream. Whisk together until combined. Simmer for 3 to 4 minutes, until thick.
- Season with thyme, salt, and pepper. Stir in cooked chicken, frozen peas, and parsley.
- Remove the skillet from the heat and let it cool slightly while you prepare the pie crust.
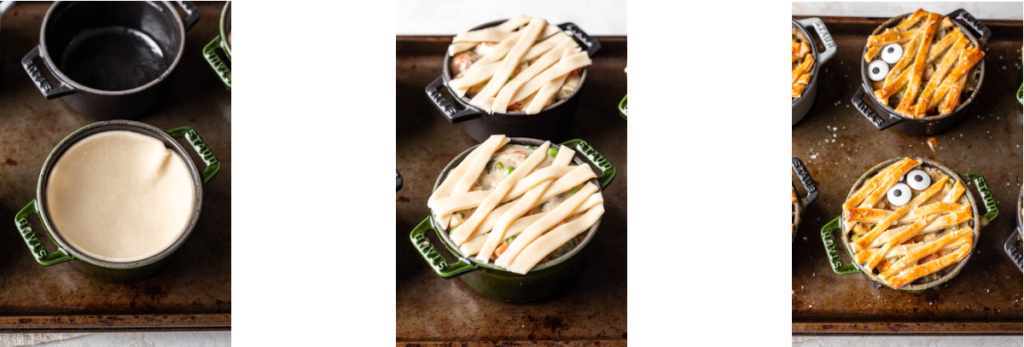
Assemble the pot pies.
- Cut six 4¼-inch circles out of the pie crust and stick them into the bottom of the prepared ramekins.
- Then, cut 4-inch strips out of the remaining pie dough.
- Fill the ramekins with the filling until it just reaches the top.
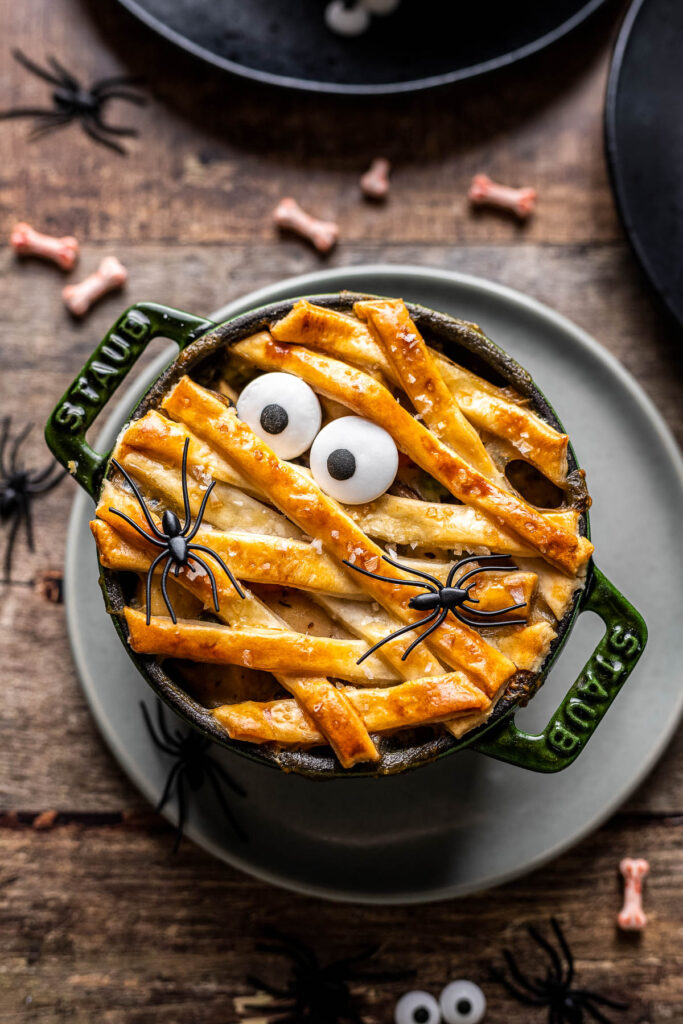
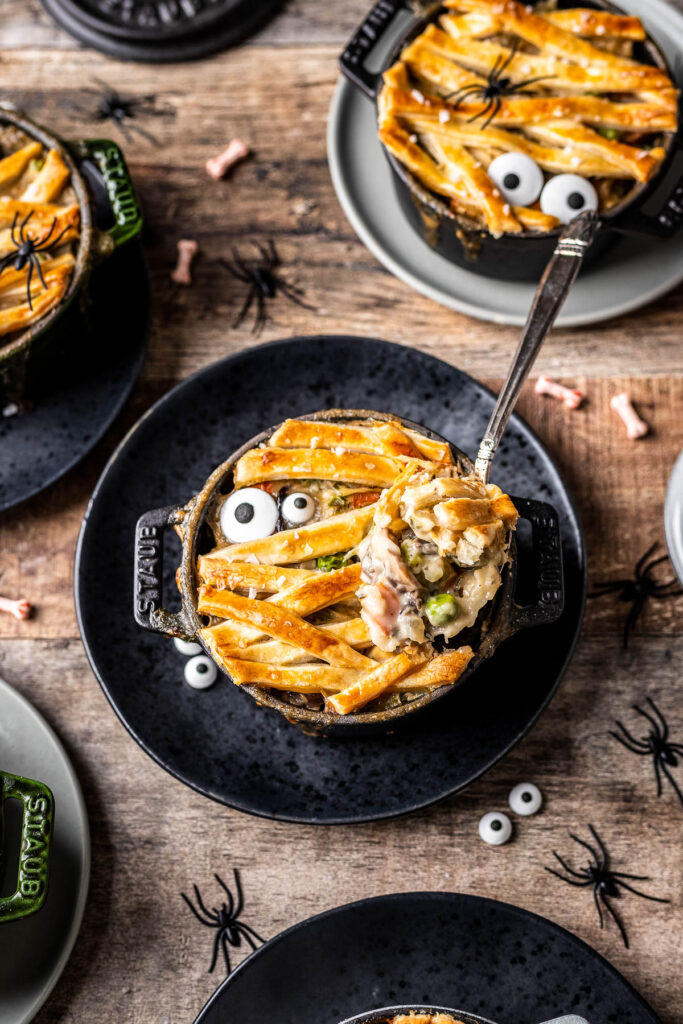
- Use the dough strips to create a mummy-like weave on top of the filling, overlapping pieces every so often. Press the sides down so they stick.
- Whisk the egg in a small bowl with 1 teaspoon of water. Brush egg over top of the dough. Sprinkle coarse sea salt on top of the egg for additional texture and flavor.
Bake.
- Place ramekins in the oven and bake for 20 to 25 minutes, or until the dough is golden brown and the filling is thick and bubbly.
- Allow pot pies to cool slightly before adding candy eyes on top to look like a mummy peeking through the dough.
Recipe Notes:
- I used a 4¼ inch round cookie cutter for my 4 inch ramekins. However, you may need to adjust accordingly, depending on the size of your small baking dishes.
- Place ramekins on a baking sheet before placing in the oven. They might bubble over a little bit.
- This recipe can easily be adjusted for an 8-inch pie dish instead. Simply place a whole 9-inch pie dough at the bottom of the baking dish, fill the dish with all of the filling, then cut out 9-inch long strips. Weave them on top of the pie and bake, according to the instructions above. Then, add the eyes to the top.
Prepping ahead of time
If you are short on time, you can prepare these ahead of time!
Make the filling and store it in an airtight container in the refrigerator for up to 2 days before assembling and baking the pot pies.
Fully cooled pot pies can be stored in the refrigerator covered with foil for up to 2 days.
How to serve this to your family
Make a complete meal from this dish by serving it with a simple side salad, some fruit, and a fun drink like witches brew.
Kids in the kitchen: How your kids can help you cook
Inviting your kids into the kitchen with you is an important step in helping them learn how to love a variety of foods.
This recipe is great because it helps them practice working with knives (or pizza cutters!) and dough, as well as sauteing vegetables, and scooping from one container to another. Plus they are so cute, kids will love making them!
- Kids aged 1-3 can help you measure out ingredients and place the dough strips on the pot pies to make mummies.
- Kids aged 4-6 can do everything above plus help chop the vegetables, sautee the ingredients on the stove, and cut and assemble the pie crust.
- Kids aged 7-10+ can help you do everything above.
*Please note that these recommendations are generalized, and to please use your personal discretion with your child’s skill level. And always, always supervise! Read more about how to have your children help you in the kitchen.
Love and links are always appreciated! If you’d like to share this post, please link to this post directly for the recipe, please do not copy and paste or screenshot. Thanks so much for supporting me! xoxo

Mini Mummy Chicken Pot Pies Recipe
Ingredients
Method
- Preheat oven to 425 degrees F. Spray 4-inch ramekins or oven-safe small pots with nonstick spray.
- Place a large skillet on the stove over medium heat. Melt the butter.
- Once butter has melted, add the onion, carrots, and celery. Cook for 5 minutes, or until the onion starts to turn translucent.
- Add in cremini mushrooms and garlic, stirring occasionally so the garlic does not burn. Cook 3 more minutes, until mushrooms are tender and any liquid they give off evaporates.
- Stir in flour until all vegetables are coated.
- Carefully pour in chicken broth and heavy cream. Whisk together until combined. Simmer for 3 to 4 minutes, until thick.
- Season with thyme, salt, and pepper. Stir in cooked chicken, frozen peas, and parsley.
- Remove skillet from the heat and allow to cool slightly while you prepare the pie crust.
- Cut six 4¼-inch circles out of the pie crust and stick them into the bottom of the prepared ramekins.
- Then, cut 4-inch strips out of the remaining pie dough.
- Fill ramekins with the filling until it just reaches the top.
- Use the dough strips to create a mummy-like weave on top of the filling, overlapping pieces every so often.
- Press the sides down so they stick.
- Whisk the egg in a small bowl with 1 teaspoon of water.
- Brush egg over top of the dough.
- Sprinkle coarse sea salt on top of the egg for additional texture and flavor.
- Place ramekins on a rimmed baking sheet and place in the oven. Bake for 20 to 25 minutes, or until the dough is golden brown and the filling is thick and bubbly.
- Allow pot pies to cool slightly before adding candy eyes on top to look like a mummy peeking through the dough.
Nutrition
Nutrition information is provided as a general estimate and may vary based on ingredients, brands, and substitutions. For specific dietary needs, we recommend calculating nutrition using your preferred tool.
I love this recipe! It was so delicious! I’ll make this again!